Please watch this video in its entirety and read the information below it before using your TyreKey for the first time.
Failure to follow the instructions or misuse of the TyreKey could potentially cause damage to your tyre or wheel.
Important and helpful information
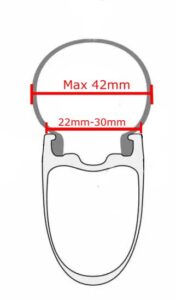
Confirm your rim is between 22-30mm external width at the top of the rim walls before using TyreKey.
TyreKey is not a substitute for good tyre installation technique. It will only work as intended when the correct tyre fitting technique outlined in our guides has been followed prior to using the TyreKey for the final part of the installation.
Periodically check that the tyre bead has stayed in the central channel of the rim during installation, as this makes the biggest difference to final fitment with the TyreKey.
Start fitting the tyre opposite the valve and finish installation with the TyreKey as close to the valve as possible – see our FAQ for an explanation as to why.
Work in very small increments from one edge of the tyre bead only. Do not attempt to lift a large portion of the tyre bead at once.
When used correctly, you will not have to use a lot of force to install the tyre. If you are having to use a lot of force, something is wrong and you should stop and double check your setup and technique.
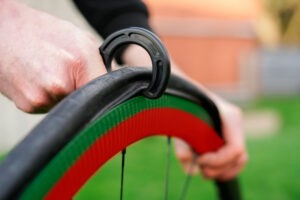
The TyreKey should only ever touch the reinforced upper part of the rim, highlighted green in the image below. This area is the reinforced sidewall which holds the tyre bead, or the brake tracks on rim brake wheels.
Do not use TyreKey on the red area highlighted below. It can be very delicate on some carbon wheels. When used correctly the TyreKey will never touch this area.
Do not use directly on decals as they may be marked.
If you are in any doubt, please stop, re-consult the video, contact us and/or take it to a local bike shop for a professional opinion.
Please use your discretion when using TyreKey. If a tyre feels impossibly tight, if you are having to use excessive force, or if something else feels ‘wrong’ during use then please stop, double check the usage instructions and if you have any doubts please contact us or take it to your local bike shop for a professional opinion.
Step by step
Tyre Removal
With the tyre fully deflated, insert the removal tip under the bead.
Slide in either direction to lift the tyre bead over the rim wall.
Tyre Installation
Inflate the new inner tube just enough to hold its shape.
Insert the valve into the valve hole in the rim.
Push the tube into the tyre.
Work around the rim, reseating the tyre as much as possible by hand.
Aim to leave the section of tyre directly over the valve until last.
Push the valve outwards into the tyre to ensure the tube is correctly seated.
Work around the whole tyre and make sure both beads are sat in the central channel of the rim and that the tube is not trapped under the bead at any point.
Fit the ‘claw’ of the TyreKey over the tyre.
The ‘heel’ of the TyreKey should be sitting directly on top of the rim wall. Do not trap the tyre between the rim wall and the TyreKey, it will damage your tyre.
Work in small increments to lift the remaining tyre bead over the rim wall, in a ‘can-opener’ style motion.
Tubeless
Installation follows the same method as clincher tyres, just without the tube.
Aim to finish installation directly above the valve to allow for maximum slack in the tyre bead.
Wide hybrid/touring tyres
Tyres which may not fit directly through the opening in the claw of the tool can still be fitted.
See final section of the video for technique to fit this style of tyre.